LED
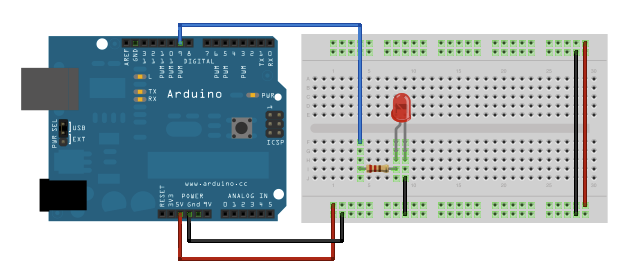
單顆LED閃爍
LED電路必須串接一顆"限流電阻",電阻值可從100歐姆到470歐姆,依照電流公式I=V/R,通過的電流由這顆限流電阻決定,因此100歐姆會比470歐姆通過的電流要大,導致的結果就是燈泡的明暗程度。
程式碼:
#define LED 13   // LED connected to digital pin 13

void setup()  {
  pinMode(red_LED, OUTPUT);      // sets the digital pin as output
}

void loop()  {
  digitalWrite(LED, HIGH);   // Output 5V to the LED, light the LED
  delay(1000);               // sleep for 1 second
  digitalWrite(LED, LOW);    // turns the LED off, output 0V
  delay(1000);               // sleep for 1 second
}
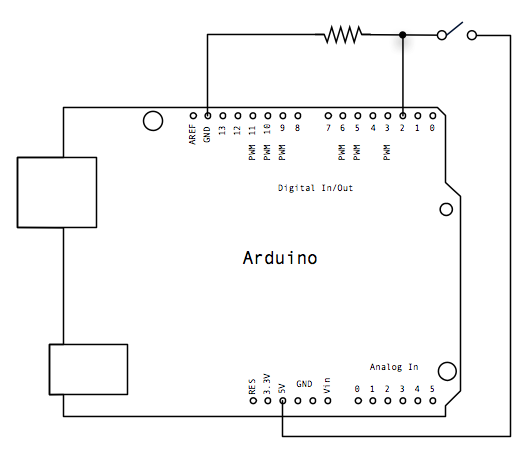
用按鈕控制LED明滅
- 一顆按鈕
- 10k歐姆或使用LED用的限流電阻
接線圖

電路圖
程式碼
/*
  Button

 Turns on and off a light emitting diode(LED) connected to digital
 pin 13, when pressing a pushbutton attached to pin 2.


 The circuit:
 * LED attached from pin 13 to ground
 * pushbutton attached to pin 2 from +5V
 * 10K resistor attached to pin 2 from ground

 * Note: on most Arduinos there is already an LED on the board
 attached to pin 13.


 created 2005
 by DojoDave <http://www.0j0.org>
 modified 30 Aug 2011
 by Tom Igoe

 This example code is in the public domain.

 http://www.arduino.cc/en/Tutorial/Button
 */

// constants won't change. They're used here to
// set pin numbers:
const int buttonPin = 2;     // the number of the pushbutton pin
const int ledPin =  13;      // the number of the LED pin

// variables will change:
int buttonState = 0;         // variable for reading the pushbutton status

void setup() {
  // initialize the LED pin as an output:
  pinMode(ledPin, OUTPUT);
  // initialize the pushbutton pin as an input:
  pinMode(buttonPin, INPUT);
}

void loop() {
  // read the state of the pushbutton value:
  buttonState = digitalRead(buttonPin);

  // check if the pushbutton is pressed.
  // if it is, the buttonState is HIGH:
  if (buttonState == HIGH) {
    // turn LED on:
    digitalWrite(ledPin, HIGH);
  } else {
    // turn LED off:
    digitalWrite(ledPin, LOW);
  }
}
跑馬燈

const int ledCount=10; //LED數量
int leds[] = {2,3,4,5,6,7,8,9,10,11};
void setup(){
 for(int i=0; i <ledCount;i++){
   pinMode(leds[i],OUTPUT);
 }
}

void turnOnSingleLED(int x){ //點亮一顆燈,作法是先用一個迴圈關閉所有燈(簡化作法),再讓要亮的燈(x)亮
  for(int i = 0; i <=ledCount;i++){
    digitalWrite(leds[i],LOW);
  }
  digitalWrite(x,HIGH);
}

void loop(){
 for(int i = 0; i <=ledCount;i++){
   turnOnSingleLED(leds[i]);
   delay(1000);
 }
}